Any Strategy Tester experts able to assist?
Why are you using Control_Point. Why not Open_Only | Or Tick | Or Tick_Data ?
I'm using "control points" because that supposedly ensures that all of the important price levels (open/high/low/close) of each M1 bar WILL be touched, without the additional processing requirements of the volume-based, interpolated ticks in "every tick" mode.
"open price" mode is not suitable because valid trades may not be opened, and running trades may not be closed as closes are controlled by the EA, not by SL/TP.
"open price" mode is not suitable because valid trades may not be opened, and running trades may not be closed as closes are controlled by the EA, not by SL/TP.
If open-price-mode period_m1 is un-suitable because it'll miss trades. Then don't you think, control-point-mode would also miss?
I'm using "control points" because that supposedly ensures that all of the important price levels (open/high/low/close) of each M1 bar WILL be touched, without the additional processing requirements of the volume-based, interpolated ticks in "every tick" mode.
Did you know: you can remove the Volume info for Period_M1 bars when Importing? This'll create m1_bars with OHLC. You can test this with every-tick-mode and have the same concept as Control Points.
*- Control Points is less-Documented and Understood IMO, I've seen too-many back-tests where the results vary dramatically compared to every-tick mode. Long-Story short, Don't Use Control Points.
Note: you cannot run a strategy in Real-Life which only triggers on price High or Low. However, you can run Every-Open-Price or Tick. Hope you can see where I"m going with this. Your approach is only good for Pretty Back-Tests. The only case where I'll make an Exception is where a) The Expert does-not care about Exact prices. & b) The Expert does-not close orders based on losses [ it just waits for the profit to exceed a certain level and close the grid]. In this case you wouldn't care much about the difference in floating losses but rather that it survived.
Your Grid-Expert seems to want to have a Stop & Take-Profit and that's usually a problem for mt4 even with tick-mode [Modeling] and all volume Information. Also it seems to want Exact-Prices instead of > vs < and that too is a problem for Real-Life modeling.
>"open price" mode is not suitable because valid trades may not be opened, and running trades may not be closed as closes are controlled by the EA, not by SL/TP.
>If open-price-mode period_m1 is un-suitable because it'll miss trades. Then don't you think, control-point-mode would also miss?
No... control-point mode is supposed to trigger the OHLC levels of the next lower timeframe so, as I'm running M5 tests, it must (according to the documentation) trigger ticks for the open, high, low & close prices of each M1 bar comprising an M5 bar.
>Note: you cannot run a strategy in Real-Life which only triggers on price High or Low.
I don't need to - this system encompasses both of your "exceptions" (which is why "control points" seemed the ideal approach)...
1) the EA doesn't care about exact prices, it's only interested in seeing the target reached or exceeded before it pulls the trigger to close positions, and
2) orders are held open until a positive close is possible
Without manipulating huge amounts of data, using "open prices" is just not viable, so that only leaves "every tick" mode.
Unfortunately, "every tick" mode increases the time to run an optimization cycle from about 12 hours to somewhere between 80 and 200 hours, depending on currency pair.
That's just not a viable situation for a self-optimizing EA because a portion of test passes are bound to be running when the market is closed and won't be valid due to "weekend spread".
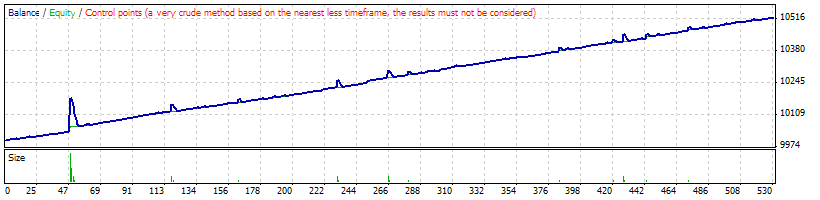
I just put together a simple Grid Strategy. Here are the results, keep in mind my data is OHLC_Volume=4 on all Period_M1 Bars. EURUSD: Test ran for January 2012, Test: Time-frame is 5_Minutes. Worse drawdown was the Open_Mode [ Maximal drawdown 267.00 (2.59%) ].
First was the Tick_Mode:

Next was the Control_Point Mode:
Lastly was the Open_Mode:

Now clearly, Tick_Mode vs Control_Point are Not the same. I even re-ran the test for Tick_Mode to see if it'll generate different result and it didn't. If you're asking why they're not the same because you expect them to-be. Then the answer is I don't know.
What I do know is that among all the above tests, the Open_Mode comes closest to what I can implement in reality. I don't care that tick_mode makes me feel better about the system because it has the best stats. I accept the worse result and brace myself for that and then some.
The future would look nothing like the above graph, as we both know this strategy is doom to fail. Over-Optimization wouldn't help either.
Unfortunately, "every tick" mode increases the time to run an optimization cycle from about 12 hours to somewhere between 80 and 200 hours, depending on currency pair.
multrix: No... control-point mode is supposed to trigger the OHLC levels of the next lower timeframe so, as I'm running M5 tests, it must (according to the documentation) trigger ticks for the open, high, low & close prices of each M1 bar comprising an M5 bar.
Yes, it misses trades also. Check-Out the Image Below. Zooming in on Period_M1 OHLC testing have a flaw. Given the Logic of the systems we are testing, our grids are getting a nice-discount every now and then. In this case my Grid-Size=20 Pips. However, I received a 2-Pips discount. We're basically Buying@Lower-Low && Selling@Higher-High. If Spreads can make a difference, so too can this.
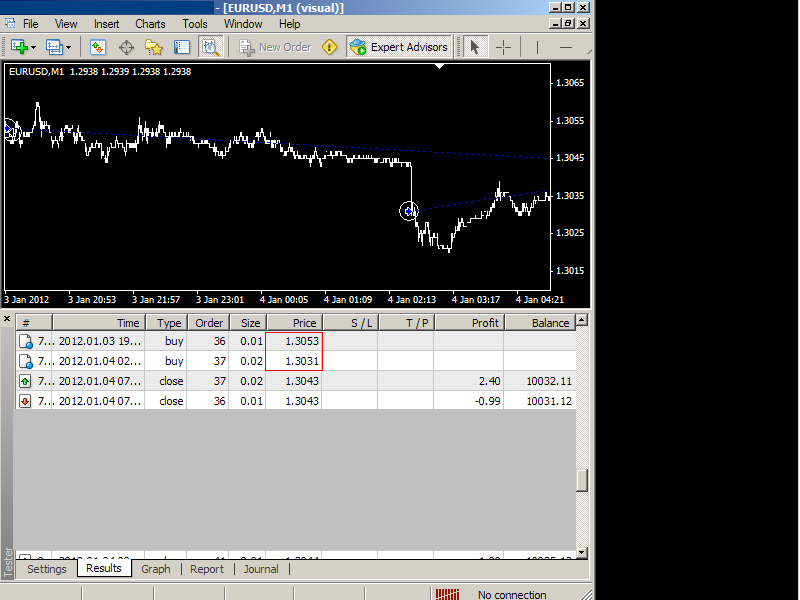
*On the Right-Side of this picture, those Buy_Trades closed at the very Peak of the re-bound before prices continued a very long down-trend. Had that second trade triggered at the correct price of 1.3033, this would have created one hell of a draw-down.
*I agree about the compromise vs Real-Tick-Data-Backtesting [not interpolated ticks]. As we go from Real> Interpolated> OHLC> Open_Only, we lose some resolution. Cannot do different things expecting same results.
- Free trading apps
- Over 8,000 signals for copying
- Economic news for exploring financial markets
You agree to website policy and terms of use
I've developed an EA - the latest of many! - that I'm checking in the MT4 Strategy Tester (build 445).
The strategy is essentially grid-based and not affected by spread changes to any noticable extent.
For speed, I've been back-testing on the M5 timeframe and using the "Control points" modeling method.
According to the MT4 help file, this *should* mean that the price "flow" follows the M1 price bars ("based on nearest less timeframe") and that control points, at the very minimum, must include the O/H/L/C levels of each "nearest less timeframe" price bar.
Since the strategy is mechanical, my view is that this M5 "control points" testing method should produce almost identical results to an M5 "every tick" test but, even though I have zero mis-match errors in both cases, it isn't - at least, not with all pairs.
Some pairs i.e. GBPUSD, are negligibly close (less than $1 difference in profit and maximum floating loss), but others vary considerably - for example, USDJPY reports $1,733 profit with $747 maximum floating loss for "control points" but $2,020 profit with $2,087 maximum floating loss when I switch to "every tick" - I'm not too bothered about the 16% increase in profit but the 179% increase in floating loss is very disturbing.
Since it's not feasible for the "every tick" price range to exceed the "control points" price range of each M1 bar, I simply cannot understand how or why the floating loss can be so wildly different between the two methods.
I've cleaned my data of price spikes but, even if I hadn't, I would have expected the "control points" method to fall foul of bad data whereas the "every tick" results seem to be the one suffering.
Can anyone point me in the right direction to identify the cause and/or resolve this?